Start Your High-Tech Gadget Business Fast and Go Live in 30 Days
When thinking about niche ideas for your business, what usually comes to mind is fashion and apparel, beauty, and art & craft. Right? But aren’t you aware of existing electronic gadget businesses? Only a small number of people consider this.
Even when they take their first step, most attempts end in failure. And some don’t even take that step, mainly because of the high cost and investment involved in electronic devices and gadgets.
On top of that, many people believe that starting an online gadget business takes a long time. They assume that running an electronics-related store requires technical knowledge, a clear understanding of business operations, and even developers to get everything set up. Of course, yes!
Look at the above stats; there are plenty of growth opportunities in this sector that can benefit even first-time owners. Starting an e-commerce gadget store isn’t actually that hard.
So, how do you start your high-tech gadget business fast and make it unique in a crowded market? This blog will show you the secret to syncing your availability across all branches. How to do that? Let’s find out.
What Do You Need to Prepare Before Launching a Gadget Store?
Before diving into preparation, you should understand how important it really is.
You might have heard this quote:
“Give me six hours to chop down a tree, and I will spend the first four sharpening the axe.”
- Abraham Lincoln
This clearly shows that preparation isn’t just important; it’s everything. Truly, it’s easier when you research and understand your business niche, which gives you confidence. But what does “research and analyze” actually mean?
I’m not asking you to dive deep or become a business expert overnight. Just get the basics right. The gadget insurance market is expected to reach $131.08 billion by 2030. Now, let’s look at a simple pre-launch checklist to start your high-tech gadget business.
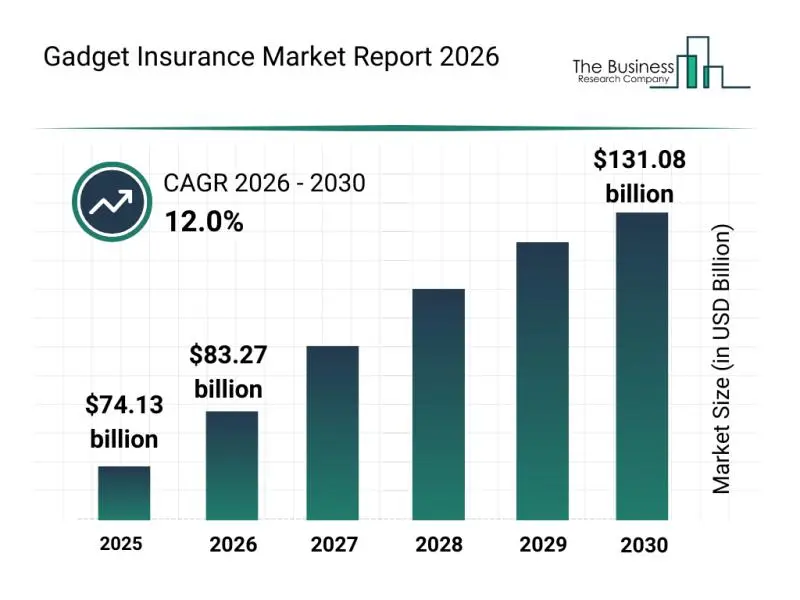
Source: https://www.openpr.com/
1. Choosing a Niche
Most beginners think of selling all kinds of things. That’s the first ever mistake they made. The first step will be the impression of your business, so the focused goal helps to gain more trust, rather than a scattered one, which focuses on quantity over quality.
So, start with the specific niche like smartphones, smart watches, and headphones. Then you can expand it later.
2. Gather Complete Product Information
What is the first thing you check before purchasing? The answer is product details. Right.
Presenting quality information about a product gains trust among the users. Quality information? Yes, instead of writing wireless headphones, you can write Noise-cancelling wireless headphones with 30 hours of battery life.
So, collect all kinds of product information like images, description, price, and SKU (unique product code).
3. Plan Your Inventory Distribution
This is where most beginners don’t think ahead. Don’t just store all products in one place. Plan where your stock will be located.
This helps to achieve fast delivery, positive customer feedback, and lower shipping costs.
4. Decide Your Shipping Strategy
A bad delivery experience, such as late delivery or product damage, can destroy trust instantly. Even if your product quality is good, this factor can wipe out everything in a minute.
And also ask some important questions to yourself, like
- Will you offer free shipping?
- Which cities will you serve first?
- Which courier partners will you see?
Because shipping is not just logistics, it directly impacts profit margins, return rates, and customer experience.
Once you have built this gadget store setup, the next step is choosing the right platform to bring your store to life. So, move to that concept further.
Which Platform is Best to Launch Your Gadget Store Fast?
So, now you have found trending products, supplies, and even prepared some pre-launch setup too. But there might be one question that emerges suddenly.
How do I actually build the store?
This is where choosing the right platform. Building an e-commerce platform feels much better if you choose a suitable platform to launch your business. Because the best platform can cut down weeks of process into just a few hours.
And more importantly for beginners, the focus should be on speed, ease, and scalability rather than advanced customization at first.
Before you choose the platform, check the characteristics of the e-commerce platform below.
Capabilities of the best e-commerce platform for a gadget shop in 2026 are,
Ready-Made Platforms (Quick Start)
Platforms like Shopify, Wix, and WooCommerce are perfect for getting started. You don’t have to worry about development, hosting, or design. Everything is already structured for you.
This means you can:
- Launch your store quickly
- Focus on products and sales instead of setup
- Start with minimal investment
However, this convenience comes with a trade-off. You are working within a system that is not fully yours.
The Limitations as You Grow
As your store gains traction, certain challenges start to appear. You may find it difficult to customise features exactly the way you want. Some integrations may require additional costs. Scaling to multiple locations or handling complex operations can become restrictive.
Over time, you also become dependent on the platform—its pricing, its updates, and its limitations. What started as a simple solution can slowly turn into a constraint.
Building Your Own Platform (Long-Term Advantage)
This is why many growing businesses eventually shift towards building their own platform. Instead of adjusting your business to fit a tool, you create a system that fits your business.
With your own platform, you get full control over every aspect—design, features, integrations, and operations. You can customise workflows, manage multi-location inventory, and scale without worrying about platform restrictions.
It may take more effort initially, but it gives you:
- Complete ownership of your store
- Flexibility to build features as needed
- Better scalability across regions and operations
- More control over long-term costs
After getting a clear idea about how to choose the correct platform, you might ask if everything is okay… But how to create a shop on platforms? We are getting closer to the process.
How to Set Up a Gadget Store Step-by-Step?
In this section, you will get a proper guide to start your high-tech gadget business on an e-commerce platform step-by-step.
Source: https://optimoroute.com/
Step 1 – Choose the Template and Customization
What’s the use of these ready-made templates? They reduce the huge burden of building everything from scratch. With this, you don’t have to start from an empty slate. Since it’s already pre-made, you can simply customize it as you need.
You can just change banner images, edit text like your brand name and tagline, and add sections like customer reviews and offers. Just a simple click—edit—save. No coding fuzzz… everything is under visual control.
If you prefer to build your own, you can start from scratch and create a unique layout. This gives you full control over every section, but it takes more time and effort. Either way works; you choose between speed with ready-made or flexibility with your own design.
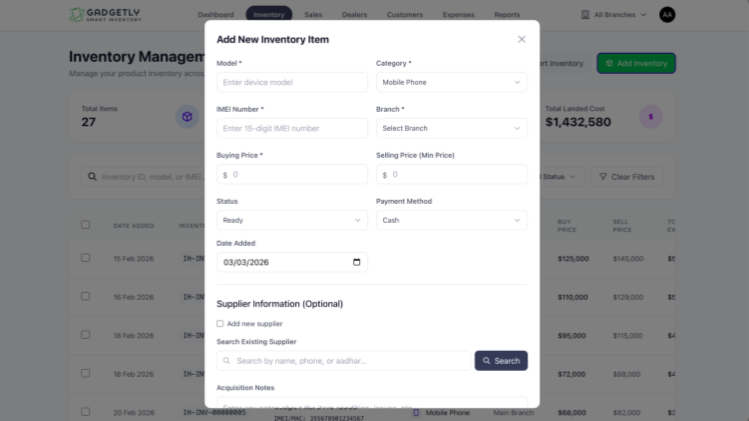
Step 2 – Upload Products
Now this is the core area. Uploading products to the shop is ultimately easier than you can imagine. Just tap “Add Product” and fill in details like product name, description, price, and product images. That’s all—your product page is ready. Repeat it for all your products.
With a template, the product pages are already structured for you, so it’s really quick. If you’re building your own store, you can design the product page layout exactly how you want, which is a little more work but lets you uniquely showcase your products.
Step 3 – Set Up the Payment Gateway
Imagine your customer is ready to buy, but you can’t support their payment method. There you are, losing one customer. And if you don’t adapt to multiple payment methods, it won’t stop with just one.
Templates often come with pre-integrated options like credit/debit cards, digital wallets, and UPI, and you can also use Razorpay for India and PayPal for international customers. Everything works instantly.
If you build your own store, you’ll need to integrate payment methods manually. It takes a bit more technical work, but it gives you complete flexibility to set up payments exactly the way you want.
Step 4 – Configure Shipping and Return
As your business grows, you won’t just be shipping locally. You may need to deliver across cities or even countries, which means managing different delivery charges, shipping times, and logistics partners.
Templates allow you to set delivery charges (free, flat, or location-based) and shipping zones quickly. You can also define return policies, like whether returns are acceptable, exchange-only rules, or time limits.
If you’re building your own store, you’ll set all these rules yourself. It takes more effort, but it’s useful if your shipping needs are unique or complex. Either way, clear shipping and return policies make the buying process smooth for your customers.
Step 5 – Connect a Domain Name
A domain name is your online identity. Templates make it easy to buy or connect a domain, giving your shop a professional look. People are more likely to trust domains like yourstore.com than Yourshop.MyShopify.com.
Building your own store also lets you connect a domain, but you’ll have full control over technical settings like DNS and email setup. The main goal is the same: make your store look credible and professional.
Step 6 – Test and Launch
After completing all the setups, it’s time to test. Add a product to the cart and try checking out. Test payments using the test mode. If everything works fine, remove the password and launch your store. In preferences, disable the password protection. Now your shop is live!
Whether you used a ready-made template or built your own, testing is the final step to make sure your store runs smoothly and that customers have a seamless experience.
How to Keep Inventory Perfectly Synced Across Multiple Locations?
Assume that you have 2 store locations. A customer orders a gadget online. But there is a problem, like that product is already sold out in one location, and your system didn’t update that it is out of stock.
And another problem is that the number of stock didn’t match the website and the warehouse. The website displays 10 items remaining. But actually, in the warehouse, there are only 4 items in balance. If the customer tries to place the order, this will create a fuzzy situation.
This is definitely going to disturb customers’ trust, causing them to cancel the order or else delay delivery.
This is where most growing stores struggle. Not because they lack products, but because they lack inventory control.
So how do you fix this? The solution is here, just keep reading.
1. Start with Real-Time Inventory Tracking
What will happen to maintain the real-time updates?
Whenever the product is purchased, returned, or moved between locations, the system tracks the product and updates immediately.
So, what’s going to happen because of that now? Reducing stock after each order, preventing overselling, and updating availability across stores. This ensures your customers only see what’s actually available.
That’s why real-time updates are the backbone of inventory syncing.
2. Use a Centralised Inventory System
Managing each location separately leads to mistakes and confusion. Here is the need for a powerhouse – a central system.
Think of it, all locations connected in one dashboard, stock updates reflect everywhere instantly, no need to update manually in each store. Everything under one control.
Using tools like the Gadget Inventory management solution will help manage goods and track the level. It will reduce the headache between overstock and out-of-stock.
3. Enable Multi-Location Stock Management
In inventory management, handling the stock level between different locations is a bit hard. A good system allows you to assign inventory to specific locations, choose where an order should be fulfilled from, and transfer stock between warehouses or stores.
If we think about “Between different locations, do I necessarily have to manage everything at the goods level?”, the result is that it helps optimise shipping costs based on location, fast delivery, and orders can be fulfilled from the nearest location.
4. Set Up Low–Stock Alerts Before It’s Too Late
Inventory issues don’t happen suddenly; they build up silently. Let’s say you have a few stocks of the recently launched mobile models, and they’re selling quite fast because of their properties. You think you have enough, but one day, suddenly, the stock runs out, and you didn’t even know it. This is where automatic low-stock alerts are essential.
Inventory software for mobile shops should notify when stock is low, plan restocking in advance, and avoid last-minute panic. Because prevention is always better than damage control.
5. Organize Products with SKU and Barcode System
Each product having a unique identity can help you in ways you might not even realize.
As your business scales, your stock range expands too. That’s when confusion starts, ‘Which variant is this product under?’ ‘Is this the correct item to dispatch?’ This led to multiple operational errors.
To avoid this, every product should have a SKU and a barcode. This helps to track products accurately, avoid duplication errors, and speed up operations.
Inventory problems don’t start as big failures; they start as small mismatches. But over time, they turn into lost customers and damaged trust.
The smartest move you can make? Set up a system that updates everything automatically from day one. Because in e-commerce, what really matters is whether your delivery performance is good enough to satisfy the customer. What’s the use if the product quality is good alone? You also need to deliver it in a way that creates a positive impression.
Once your inventory is synced like this, automation becomes the natural next step.
What Tasks Can Be Automated to Save Time in a Gadget Store?
What is actually automation?
An advanced technology? Do I need to learn a lot of things to handle that?
What if it’s actually just a system that removes manual operations from daily work?
Imagine doing a task just once and never having to touch it again. That’s what automation does. You set the rules once, and the system keeps running them for every task that follows.
In our day-to-day life, we already use automation a lot. But in e-commerce, automation plays an even more crucial role.
So here, let’s look at which tasks can be automated using automation, and what benefits you gain by doing so.
1. Order Tracking
Just imagine you’ve already received 15 orders. The correct warehouse is assigned, shipping labels are ready… but you didn’t manually handle anything. That’s where automation in order routing comes in. It takes care of the entire process without constant monitoring.
Platforms like Shopify allow you to set simple rules, such as:
- If the customer is in Thailand, ship from Bangkok
- If the customer is in South India, ship from Chennai
Once these rules are in place, orders are automatically directed to the right location. This not only saves time but also reduces errors and speeds up delivery.
2. Customer Notification
Customer orders at 2 am. They have to get confirmation immediately, the next day gets tracking, and a delivery message after arrival.
They might think there is a bigger team functioning for this much quality interaction with users. But the soloplayer is automation. You don’t need to send confirmation manually; later, send the order tracking link, and answer the customer’s order-related queries.
3. Store Cloning/Scaling
You want to expand your business to a new city. So, you need to build a website again, add products again, set shipping, and configure payments again based on your new location.
Wait, wait… why go that far? Automation is the easiest way to build a website, as it lets you duplicate existing stores and adjust location-specific settings. With automation, scaling your business becomes effortless.
Which Metrics Should Track After Launch?
Is Everything Over After Launching Your Store? Not Even Close. There’s a common misconception among beginners that once your store goes live, the hard part is done. But in reality, launch day is just like the opening scene.
The truth is simple – maintenance is what keeps a business alive.
Once your store is live, tracking and maintaining it is the only way to truly understand how your business is performing. Without this, you’re running blind. You won’t know where you’re losing money, what your customers actually like, or why they leave without buying.
So now the real question is “What should you actually track after launching your store?” Let’s start with one of the most important and often underestimated metrics,
1. Website Speed and Load Time
Your website speed is your first impression. If your store takes too long to load, customers won’t wait; they’ll leave. It’s not about your product or price. A slow site simply breaks the experience. A fast website, on the other hand, builds trust and professionalism instantly.
2. Checkout Completion Rate
Getting a customer to the cart is not the finish line. Many leave before completing the purchase. If this happens often, something is wrong—maybe a complicated checkout, hidden costs, or lack of trust. Identify the issue, fix it, and you don’t just recover sales, you prevent future drop-offs.
3. Successful Order Delivery Rate
An order is only successful when it reaches the customer. Delays, cancellations, returns, or failed deliveries all impact your business. Each one shows where things are going wrong. By tracking these, you improve not just delivery but the entire customer experience.
How Can You Attract Customers on the First Day of Launch?
Most people think attracting customers is about promotion. But on day one, it’s actually about creating a reason for people to act immediately.
Because the truth is, people don’t care that your store launched. They care about what’s in it for them right now.
So instead of just announcing your launch, create a “first-day advantage.”
For example, give early visitors something they can’t get later:
- Limited-time launch pricing
- First 50 orders get an extra product or discount
- Exclusive access to a product before it becomes public
This creates urgency. Now people don’t just see your store, they feel like they might miss out if they don’t act.
Next, make your launch feel like an event, not just a website or gadget inventory system going live. Build a small moment around it. You can count down your launch, tease 2–3 products before release, or even ask your audience to guess prices or features. When people feel involved before the launch, they’re more likely to show up on day one.
Another powerful move is to leverage your immediate circle first. Do you know where you should build your first set of customers from? As a beginner, your customer journey usually starts with your close circle.
And here’s something most beginners miss: don’t try to sell everything at once. Highlight one hero product. Make it the face of your launch. When customers are not overwhelmed with choices, they decide faster.
Focus on momentum, not perfection. A store with activity orders, reviews, and updates feels trustworthy. Even small signals like “5 people bought this today” or “only 3 left” can push someone to take action.
So instead of asking, “How do I promote my store?”
Ask this: “Why should someone buy from me today and not later?” That shift alone is what brings your first customers in.
Source: https://whidegroup.com/
How Appkodes Helps You to Launch Fast and Multi-Location Ready
In the world of online business, speed isn’t just an advantage; it’s often the difference between leading the market and getting lost in it.
Many beginners spend months perfecting everything before launching. But here’s the truth: you don’t need a perfect store to start, you need a live store to learn.
Because when you launch fast, something powerful happens. You start getting real customers, make your first sales, and, most importantly, collect real feedback.
Maybe before this blog started, an e-commerce gadget store within 30 days sounded like a nightmare. But now you know the complete core. That’s your competitive advantage in an online gadget store.
Additionally, you have great support on your side to achieve success in your business.
Appkodes, a leading startup mobile app development company, brings all of this together in one place.
Instead of juggling multiple tools and struggling with setup, our development team helps you launch faster, manage smarter, and scale without friction. It’s built for beginners who want to move quickly.
So, finally, the opportunity is already there. Tools are ready. And you have Appkodes as your supportive system, which is more than your competitors have.
Everything is settled down. Now the only question is, when will you start? Connect with our Appkodes teams and start your high-tech gadget business today!

Arun Andiselvam
Founder of AppKodes. As a serial entrepreneur, I have successfully established five brands over the past 12 years. After creating a successful rank tracker for SEO agencies, I am currently dedicated to developing the world's first SEO Project Management software.